這篇要講的是利用矩陣 (Matrix) 運算來移動 3D 物件的方法。假設我們有一個 3D 物件 (先不用管 “物件” 的定義是什麼),在 3D 環境中,我們能對它做的轉換有
- 移動物件位置,或解釋成替換座標系統 (在真實世界中,要拍一座山是人拿著相機去山前,但在3D繪圖世界中,把山移到相機前面有時比移動相機容易 ^_^)
- 放大或縮小
- 對 X、Y、Z 軸做旋轉
對於任何一項,其實用國中程度的加減法與三角函數都可以解決。那為什麼要用矩陣呢? 原因我會寫在最後,我們先來看矩陣的基本運算。
矩陣的乘法

用 C++ 實作矩陣乘法
標準的 C++ 並沒有 Matrix 相關的標準庫,需要自己寫一個。因為只是二維陣列的加減乘除,你可以簡單的用 std::vector 甚至 c-style array 來實現。我下面的例子是用 std::valarray 來做。
#include <valarray>

template <class T>
class Matrix
{
  public:

  ...

  // assign matrix value by row, column and an array of data
  void set(int row, int column, T data[])
  {
    row_ = row;
    column_ = column;
    set(data);
  }

  // assign matrix value by an array of data without changing size
  void set(T data[])
  {
    std::valarray<T>
    matrix(data, row_*column_);
    matrix_ = matrix;
  }

  // member data accessor, get value T
  at(size_t row, size_t column) const
  {
    return matrix_[row*row_ + column];
  }

  // member data accessor, get value
  T at(size_t index) const
  {
    return matrix_[index];
  }

  // member data accessor, set value
  void set(size_t row, size_t column, T val)
  {
    matrix_[row*row_ + column] = val;
  }

  // operator overloading, matrixA = matrixB * matrixC
  template <class T>
  friend Matrix<T> operator* (const Matrix<T>& lhs, const Matrix<T>& rhs)
  {
    std::valarray<T> result(lhs.row_ * lhs.column_);
    for (size_t row = 0; row < lhs.row_; row++)
    {
      for (size_t column = 0; column < lhs.column_; column++)
      {
        std::valarray<T> lhval =
          (lhs.matrix_)[std::slice(row*lhs.column_, lhs.column_, 1)];
       std::valarray<T> rhval =
          (rhs.matrix_)[std::slice(column, rhs.row_, rhs.column_)];
       std::valarray<T> multi = lhval * rhval;
          result[row*lhs.row_ + column] = multi.sum();
      }
    }

    Matrix<T> ret(lhs.row_, lhs.column_, result);
    return ret;
  }

  ...

  protected:
    std::valarray<T> matrix_; size_t row_; size_t column_;
};
std::valarray 這個 STL class 在使用上並不是很直覺,用的人也不多,它唯一的優點也只有數學運算速度比 std::array 或是 std::vector 快而以。如果看了覺得不太清楚,強烈建議自己用熟悉的語法或函式庫重寫一個自己的 Matrix class。
變換矩陣 (Translation matrices)
我們把以下的矩陣稱為變換矩陣 (Translation matrices),是用來移動一個或一組 3D 的點用的的位置用的。
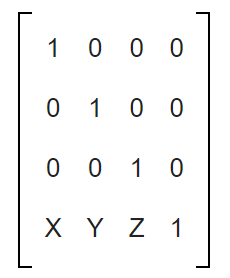
如果我們有個點是 (2, 2, 2),移動到相對於目前原點的 (3, 4, 5),計算後新的點的位置如下
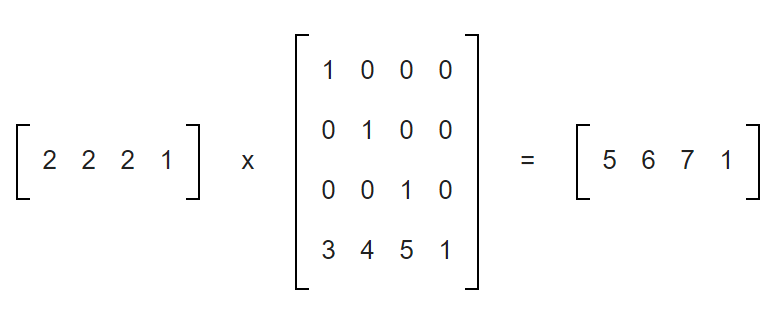
將 (x, y, z ) = (2, 2, 2),和變換矩陣相乘後,得到新的作標 (x, y, z) = (5, 6, 7)。
用 C++ 實作變換矩陣
#include <valarray>

template <class T>
class Utility
{
  public:
    static void set_translate(Matrix<double>& matrix, double x, double y, double z)
    {
      double data[16] = {
        1, 0, 0, 0,
        0, 1, 0, 0,
        0, 0, 1, 0,
        x, y, z, 1 };

        matrix.set(data);
    }
};
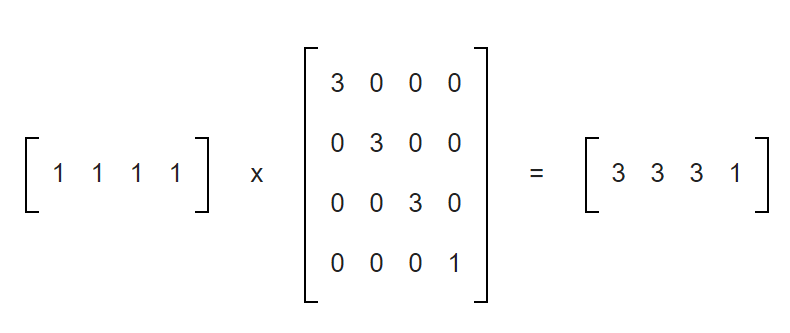
縮放矩陣 (Scaling matrices)
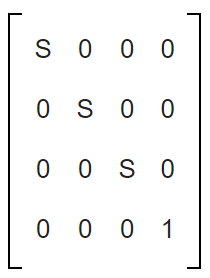
如果我們有個點在 (1, 1, 1),放大二倍 (S=3),新的位置為 (3, 3, 3)
用 C++ 實作縮放矩陣
#include <valarray>

template <class T>
class Utility
{
  public:
    static void set_scale(Matrix<double>& matrix, double scale)
    {
      double data[16] = {
        scale, 0, 0, 0,
        0, scale, 0, 0,
        0, 0, scale, 0,
        0, 0, 0,     1 };

        matrix.set(data);
    }
};
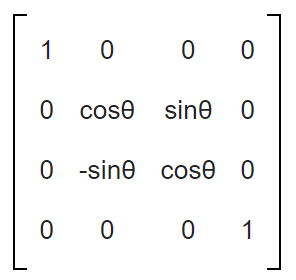
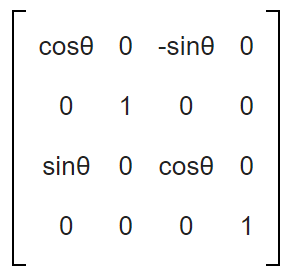
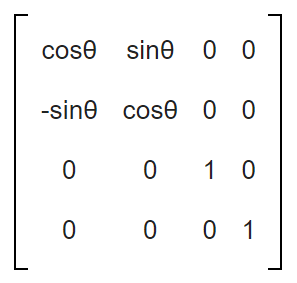
旋轉矩陣 (Rotation matrices)
我們把以下三個矩陣稱為旋轉矩陣,分別是用來對 X 軸,對 Y 軸,對 Z 軸旋轉 θ 度用的。一般程式中的 θ 指的是弧度 (radian) 不是角度 (degree),也就是介於 0 到 2π 的數字。
對 X 軸旋轉旋轉 θ 度
#include <valarray>

template <class T>
class Utility
{
  public:
    static void set_rotateX(Matrix<double>& matrix, double radian)
    {
      double data[16] = {
        1, 0, 0, 0,
        0, cos(radian), sin(radian), 0,
        0, -sin(radian), cos(radian), 0,
        0, 0, 0, 1 };

        matrix.set(data);
    }
};
對 Y 軸旋轉旋轉 θ 度
#include <valarray>

template <class T>
class Utility
{
  public:
    static void set_rotateY(Matrix<double>& matrix, double radian)
    {
      double data[16] = {
        cos(radian), 0, -sin(radian), 0,
        0, 1, 0, 0,
        sin(radian), 0, cos(radian), 0,
        0, 0, 0, 1 };

        matrix.set(data);
    }
};
對 Z 軸旋轉旋轉 θ 度
#include <valarray>

template <class T>
class Utility
{
  public:
    static void set_rotateZ(Matrix<double>& matrix, double radian)
    {
      double data[16] = {
        cos(radian), sin(radian), 0, 0,
        -sin(radian), cos(radian), 0, 0,
        0, 0, 1, 0,
        0, 0, 0, 1 };

        matrix.set(data);
    }
};
矩陣的結合律
矩陣的乘法有結合律,也就是說
( MatrixA * Matrix B ) * Matrix C = MatrixA * ( MatrixB * MatrixC)
以立方體的例子來說,原本八個點每隔都要做五次矩陣乘法,共 40 次。但我們是先將五個轉換矩陣相乘,得出一個單一的轉換矩陣,接下來八個點只要跟最後的轉換矩陣相乘即可。運算次數從 40 次降為 10 次,對效能有很大的提升。
實際例子
- (1, 0, 1)
- (1, -1, 1)
- (-1, -1, 1)
- (-1, 1, 1)
- (1, 0, -1)
- (1, -1, -1)
- (-1, -1, -1)
- (-1, 1, -1)
- 將立方體放大 20 倍
- 將立方體對 X 軸轉 θ 度
- 將立方體對 Y 軸轉 θ 度
- 將立方體對 Z 軸轉 θ 度
- 將立方體從 (0, 0, 0) 移動到 (200, 200, 200)
Sample_1::Sample_1()
{
  // vertices for a cube
  pts_[0].set(1, 1, 1);
  pts_[1].set(-1, 1, 1);
  pts_[2].set(-1, -1, 1);
  pts_[3].set(1, -1, 1);
  pts_[4].set(1, 1, -1);
  pts_[5].set(-1, 1, -1);
  pts_[6].set(-1, -1, -1);
  pts_[7].set(1, -1, -1);

  rotate_degree_ = 0;
}

void Sample_1::paintCubePoints(
  BYTE* buf, LONG width, LONG height, WORD bytePerPixel)
{
  Matrix<double>  scale_matrix(4, 4);
  Matrix<double>  translate_matrix(4, 4);
  Matrix<double>  rotate_matrixX(4, 4);
  Matrix<double>  rotate_matrixY(4, 4);
  Matrix<double>  rotate_matrixZ(4, 4);

  // add one degree each time pain() has been called
  rotate_degree_ += 1;
  double radian = (rotate_degree_ % 360) * 2 * pi_ / 360;
  Utility::set_rotateX(rotate_matrixX, radian);
  Utility::set_rotateY(rotate_matrixY, radian);
  Utility::set_rotateZ(rotate_matrixZ, radian);
  Utility::set_scale(scale_matrix, 20);
  Utility::set_translate(translate_matrix, 200, 200, 200);

  // final matrix, be careful of the order
  Matrix world_matrix =
    scale_matrix * rotate_matrixX *
    rotate_matrixY * rotate_matrixZ *
    translate_matrix;

  // get new position for each vertices
  for (int i = 0; i < 8; i++)
  {
    PointF pt = pts_[i] * world_matrix;

    // ignore the point if outside the screen
    if (pt.x_ <= 0 || pt.x_ >= width
     || pt.y_ <= 0 || pt.y_ >= height)
    {
      return;
    }

    // draw a white point RGB(255, 255, 255) on x and y
    int anchor = ((int)(pt.y_) * width + (int)(pt.x_))
      * bytePerPixel;
    buf[anchor] = 0xFF;
    buf[anchor+1] = 0xFF;
    buf[anchor+2] = 0xFF;
  }

  return;
}
實際運作的截圖如下,本來應該做成 GIF 的,真實畫面就是這八個點一直在轉動。